Tuesday, December 14, 2010
NEW Blog

Sunday, December 5, 2010
Friday, November 19, 2010
Time to relax!
Thursday, November 18, 2010
The Learning Tower & Giveaway at Go Graham Go
Tuesday, March 30, 2010
Part Two: Carrot Cake!!!

- In a mixing bowl combine Flour, baking powder, baking soda, salt and cinnamon.
- In a large mixing bowl combine eggs, sugar, oil, buttermilk, vanilla.
- Gradually add flour to mixture, don't over mix!
- Then Stir in carrot, pineapple, and coconut.
- Now if you are making a cake use two 9in cake pans or really any size, this cake does not rise much so fill the pan :)
- In my case I was making this for a party and needed to make bite size mini cakes. SOoo I used two pyrex baking/ casserole dishes, lined them with a sheet of tin foil, and sprayed the foil with non-stick cooking spray. This was so I could lift the cake out without any problems and less clean up :)


- For cake: Spread Cream Cheese Frosting between layers and on top and sides of cake. Crush walnuts and apply them to the sides of the frosting.
- For Mini Cakes: Get a small 2-3in cookie cutter (I didn't have these so I used the top of a baby food jar, and knife) Cut out the rounds (each pan made 15 rounds with the jar top)

Sunday, March 28, 2010
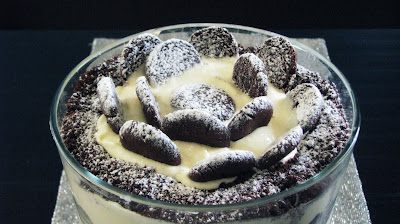
Engagement Party Part One: Dirt Cake

For the chocolate wafers:
1 1/4 cups all-purpose flour
1/2 cup unsweetened Dutch process cocoa
1 teaspoon baking soda
1/4 teaspoon baking powder
1/4 teaspoon salt
1 to 1 1/2 cups sugar [see recipe note]
1/2 cup plus 2 tablespoons (1 1/4 sticks) room-temperature, unsalted butter
1 large egg
I did not make the filling but I'm sure it would be great if you added it in!
For the filling:
1/4 cup (1/2 stick) room-temperature, unsalted butter
1/4 cup vegetable shortening
2 cups sifted confectioners’ sugar
2 teaspoons vanilla extract
- Set two racks in the middle of the oven. Preheat to 375°F.
- In a food processor, or bowl of an electric mixer, thoroughly mix the flour, cocoa, baking soda and powder, salt, and sugar. While pulsing, or on low speed, add the butter, and then the egg. Continue processing or mixing until dough comes together in a mass.
- Take rounded teaspoons of batter and place on a parchment paper-lined baking sheet approximately two inches apart. With moistened hands, slightly flatten the dough. Bake for 9 minutes (mine only took 7 minutes so watch em!), rotating once for even baking. Set baking sheets on a rack to cool.
- To make the cream, place butter and shortening in a mixing bowl, and at low speed, gradually beat in the sugar and vanilla. Turn the mixer on high and beat for 2 to 3 minutes until filling is light and fluffy.
- To assemble the cookies, in a pastry bag with a 1/2 inch, round tip, pipe teaspoon-size blobs of cream into the center of one cookie. Place another cookie, equal in size to the first, on top of the cream. Lightly press, to work the filling evenly to the outsides of the cookie. Continue this process until all the cookies have been sandwiched with cream. Dunk generously in a large glass of milk.

1 package (8 ounces) fat-free cream cheese
1 package (3 ounces) cream cheese, softened
3/4 cup Pure Cane Powdered Sugar
2 packages (1 ounce each) instant vanilla pudding mix (I used one package of French Vanilla, to give it extra flavor!)
1 tub (12 ounces) cool whipped topping
All of the Homemade Oreos!! ground, crushed
Thursday, March 25, 2010
Update
Friday, March 12, 2010
BEST Pizza EVER!

12-16 slices

Crust Ingredients:
3/4 cup water (110-115 degrees, preferably)

1. If using a bread machine to make pizza dough, put ingredients in bread machine in order listed and set to dough setting.
If making dough by hand, mix water, butter, and sugar in mixing bowl. Add part of the flour and stir. Add the rest of the flour and the yeast, and stir into a dough. Knead for 6-8 minutes, or until dough is smooth and elastic. Set dough in bowl and grease the top. Cover with a towel and set in a warm place to rise for about 45 minutes.*
2. After dough has risen the first time, punch down and knead until air bubbles are removed.
3. Liberally butter a 16-inch round pizza pan, and press dough onto pan. Carefully lift one-half of the crust and fold over (to expose half of the pizza pan). Sprinkle 1/2 Tablespoon cornmeal over pan. Lay crust back in place and repeat on other half, so that there is cornmeal sprinkled between entire layer of crust and pan.
4. Sprinkle 1/2 teaspoon salt over top of crust and then spread with 1 cup pizza sauce. Sprinkle on cheese and any optional toppings desired. Sprinkle on oregano, basil, and parmesan cheese last.
5.** Place pizza in oven and turn heat to 400 degrees. Bake for 10 minutes; rotate crust and bake for an additional 5-10 minutes or until top is browned. (Be sure to watch so it doesn't burn; every oven is different!)
6. When pizza is browned, turn off heat and open oven door. Leave pizza in oven until ready to serve. Then remove from oven, cut, and serve. If there is leftover pizza, we often put the pieces directly on a cooling rack to cool, which prevents condensation forming between the crust and pan.
Monday, March 8, 2010
Another fresh start in the cooking world

Shout out to all the parents and married folks out there who love to cook! Yay! I love to cook but not with a one year old strapped to my leg, so I cook during his naps! Today I made Blueberry Pancakes! I made one to try since, I'm new to homemade cooking. The rest I stuck in the freezer for another day. Here is the recipe I used, it's very delicious!
INGREDIENTS
2 cups all-purpose flour or whole wheat flour
1/4 cup sugar
1/2 teaspoon salt
2-1/4 teaspoons baking powder
1/2 teaspoon baking soda
2 cups buttermilk
2 large eggs, lightly beaten
1/4 cup unsalted butter, melted
1 cup fresh blueberries
Unsalted butter to cook the pancakes
PREPARATION
1. In a large bowl, sift together the flour, sugar, salt, baking powder and baking soda.
2. In another bowl, combine the eggs, buttermilk and melted unsalted butter and mix well.
3. Add the wet ingredients to the dry ingredients and mix gently, preferably with a spatula, just until the ingredients are all wet. The batter should be lumpy. Do not over mix!
4. In a pan, melt 1 or 2 tablespoons of butter over medium-low heat. Ladle the batter into the pan 1/3 of a cup at a time. Depending on the size of your pan you can make 2 or 3 pancakes at a time. If you want smaller pancakes use less batter.
5. Sprinkle the blueberries over the pancakes and cook until bubbles appear along the edges and surface of the pancakes. The edges will begin to brown slightly (should take 2 or 3 minutes).
6. Carefully flip the pancakes and cook for an additional 2 or 3 minutes.
7. Serve the pancakes with butter and maple syrup.
8. Enjoy!


